Understanding Seed Germination
Introduction to Germination
Understanding the fundamentals of seed germination helps gardeners improve success, regardless of their experience level. These fundamentals provide an understanding of the “whys” behind the “hows” when germinating seeds and growing seedlings.
By paying careful attention to the key factors that regulate germination, gardeners can consistently grow high quality seedlings with reduced losses from cultural problems and seedling diseases. Remember that seeds are living organisms even before they germinate and begin growing.
Seed germination is a fascinating and remarkable process. It involves several different steps. First, seeds absorb water, in a process called “imbibition.” Seeds require moist conditions in order to take up water initially. This is why it is so important to keep the growing medium consistently and evenly moist while seeds are germinating and to ensure there is good contact between the growing medium and the seed. It is also a reason that keeping stored seeds dry, with low moisture content, is important.
Interestingly, imbibition is a physical process that will occur whether a seed is alive or dead. After imbibing water, seeds begin stage II of germination, the metabolic preparation stage. In this stage, biological processes greatly speed up inside the seed. Enzymes are activated and nutrients mobilized to fuel growth. The third stage of germination is when visible growth starts and the initial root, or “radicle” emerges.
As water is absorbed, germinating seeds greatly increase their respiration rate and their need for oxygen. Oxygen becomes limiting for seeds when the media is completely saturated with water, particularly if the seed is covered with media. An overabundance of water displaces oxygen in the media, stressing seedlings, reducing growth, and promoting disease. This is the reason that using a seed starting mix that holds moisture and also drains well is very important for seed germination.
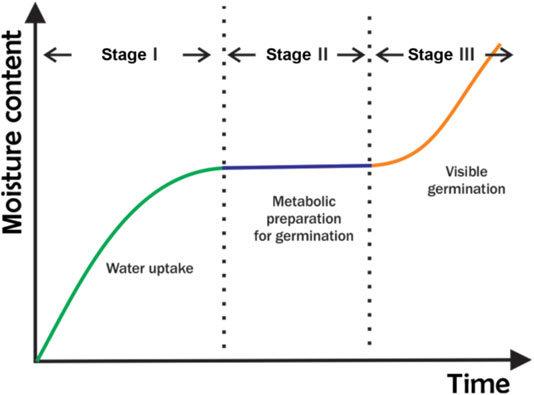
Figure 1: The three stages of seed germination
Once a seedling’s cotyledons expand, it can begin to photosynthesize food from sunlight. As the true leaves develop, nutrients stored in the cotyledons are mobilized to actively growing parts of the plant and the cotyledons yellow and drop off.
Key Factors in Germination – Moisture
Moisture in adequate amounts, as stated above, is critical during germination and seedling growth. Most species need consistently moist conditions until the radicle emerges. As seedlings grow, they become more tolerant of fluctuating moisture levels and the media should gradually be allowed to dry out between waterings.
Water quality is important. Avoid using water that is treated with a water softener, as it can contain salts that are damaging to plants. City water that is chlorinated can be allowed to sit in an open container or bucket overnight to remove the chlorine. Lukewarm water is ideal, as very cold water can reduce media temperature, slowing germination, and it can be stressful to seedlings.
How water is applied is also important. Especially when dealing with very small seeds, watering should be done gently, to avoid disturbing the placement of the seeds or moving media particles onto the growing point of small seedlings. Using a fine mist nozzle or sprayer or watering from the bottom of the tray are ideal options. When bottom watering, do not let the tray remain in water after it is sufficiently moistened, as this can oversaturate the media and reduce oxygen levels.
Key Factors in Germination – Temperature
Temperature affects the rate at which seeds germinate. Different species typically germinate over a fairly wide range of temperatures, but germination is usually fastest in a smaller, optimal range. This optimal temperature is what is used for the recommended germination temperature on seed packets. Both low temperatures and overly high temperatures can reduce seed germination, and germination is generally slower at cool temperatures. Most annual flower and vegetable seeds germinate well at 70 to 75 °F, though some benefit from cooler or warmer conditions. Providing consistent temperatures in the optimal range generally helps to ensure uniform germination. Using a thermostatically controlled seedling heat mat is an excellent way to provide the optimal temperature to germinating seeds.
Some species germinate best when night temperature is cooler than the day temperature by at least 5 to 10 °F. There are a few options for providing alternating temperatures easily. One is to sow directly in the garden or into flats placed outdoors. A second option is to use a timer on a seedling heat mat. Set the timer to turn the heating mat off at night and on again in the morning.
Examples of species that benefit from fluctuating temperatures:
- Bloodroot (Sanguinaria canadensis)
- Canadian Wild Ginger (Asarum canadensis)
- Celery (Apium graveolens)
- Garden Phlox (Phlox paniculata)
- Iris (Iris forrestii, I. lactea, I. setosa)
- Jack-in-the-Pulpit (Arisaema triphyllum) and other Arisaema spp.
- Lady’s Mantle (Alchemilla alpina, A. vulgaris)
- Shrub Dogwoods (Cornus alternifolia, C. amomum, C. alba)
- Spider Flower (Cleome spp.)
- Spotted Jewelweed (Impatiens biflora)
- Walnut (Juglans cinerea, J. nigra)
Warm Germination Temperature Species (80 to 85 °F)
- Tickseed (Coreopsis spp.)
- Orange Coneflower (Rudbeckia fulgida)
- Pepper (especially hot types)
- Eggplant
- Hard shelled gourd (Lagenaria)
- St. John’s Wort (Hypericum spp.)
- Okra
- Saxifrage (Saxifraga x arensdii)
- Hens & Chicks (Sempervivum spp.)
- Watermelon (germinate seedless types warmer – 90 to 95 °F)
Cool Germination Temperature Species (60 to 65 °F)
- Candytuft (Iberis spp.)
- Checker Mallow (Sidalcea malviflora)
- Cyclamen
- Delphinium
- False Indigo (Baptisia spp.)
- Lavender (Lavandula spp.)
- Pansy and Viola (Viola spp.)
- Peruvian Lily (Alstroemeria spp.)
- Poppy (Papaver alpinum, P. nudicaule)
- Primsose (Primula spp.)
- Windflower (Anemone spp.)
Growing On Temperatures
Note that once the radicle emerges, growing on temperatures generally should be decreased to 65 to 70 °F, and some species prefer even cooler temperatures. Reducing temperature helps to ensure sturdy growth and helps to avoid stretching.
Key Factors in Germination – Light
Light can have a stimulating or an inhibiting effect on seed germination for some species. Seed which requires or benefits from light is usually surface sown and not covered. Species requiring dark conditions to germinate are less common than those that benefit from light. Seeds of dark-requiring species are generally planted deeply enough to exclude light from the seed.
Some species have different optimal germination temperatures depending on whether they are exposed to light or kept in darkness.
Improving Germination & Seedling Quality
Choosing Media
Garden soil is not a good seed starting mix. When used in small containers, it tends to become compacted, drain poorly, and not hold oxygen well. It can also contain weed seeds and pathogens. A good media for starting seeds has a fine-textured particle size, holds moisture well, but also has sufficient pore space to be well aerated. Most seedling mixes are composed primarily of peat moss mixed with perlite (an expanded volcanic rock) and/or vermiculite (an expanded mica). Some mixes now use coir (coconut fiber) instead of or in addition to peat moss.
Use a quality, name brand media. Use seed starting mixes that do not contain a significant amount of fertilizer (under 1% nitrogen). High fertilizer levels can lead to high salt levels in the media, which can inhibit germination. Also, it is easy to leach fertilizer out of the mix when watering, and seedlings generally do not need fertilization until after their first true leaves have expanded.
Media Amendments
A good quality hot compost or earthworm castings can be added to media at 5 to 20%. This adds some slow-release nutrients and plant beneficial compounds that can help promote good seedling quality.
There are medias with absorbent gel additives that provide extra water holding capacity to seed starting mixes. These gels may not break down well in the soil, they hold little water when plants are fertilized, and they usually add significant cost to the media. I do not personally recommend or use these additives.
Filling Containers
Growing media often dries out in storage, and peat becomes resistant to re-wetting when overly dry. Bottom watering is a technique to help moisten media that has become very dry. Fill containers with dry media (wearing a dust mask is recommended when working with extremely dry, dusty media). Then put the filled containers into a tray filled with water. Trays will slowly absorb water from below, until all the media is moistened. It may be necessary to refill the tray if all the water is absorbed before the media is fully moistened.
Light
Photosynthesis drives plant growth, and light is the key factor in photosynthesis. Light intensity (strength) and quality (spectrum) are key factors in light quality. Photosynthetically Active Radiation (PAR) is the light spectrum useable by plants for photosynthesis. Note that this is a different spectrum than what the human eye sees!
Some light measurements are not very useful when it comes to plant growth. Lumen is a term related to the human eye spectrum of light. Lux is a measure of lumens per square foot and is also called footcandles. Plant scientists measure light in horticulture as micromoles per square meter per second is the scientific measurement – µmol/m2/s. This is a measurement of the photons of light impacting a square meter every second.
Watts is another unhelpful measurement, now that lighting systems with improved efficiency are available. Often these systems will list actual watt useage, plus another value showing their equivalent watt output for a less efficient lighting system.
To keep light levels high, keep fluorescent and LED lights close to seedlings. It is ideal to have a system that can raise and lower lights as needed. Raising trays by putting them on an overturned tray can also be helpful. When growing on windowsill, regularly rotate trays to keep growth even and upright.
Light Sources
Fluorescent lights have been widely used by gardeners to grow seedlings indoors. Older, T12 “shop lights” work fine. These lights use 1 ½ inch diameter bulbs. Newer fluorescents are more efficient and use narrower tubes. T5 fluorescents are the most efficient types of fluorescent lamps and have 5/8 inch diameter tubes. Compact fluorescent (CFL) bulbs can be used in incandescent fixtures to grow seedlings or supplement windowsill light.
LED lamps are the newest lighting systems for plants. They are more efficient than fluorescents and have come down in price in the last few years. They are very efficient (low power use) and offer a wider choice of spectrum than fluorescents, and they have a long bulb life.
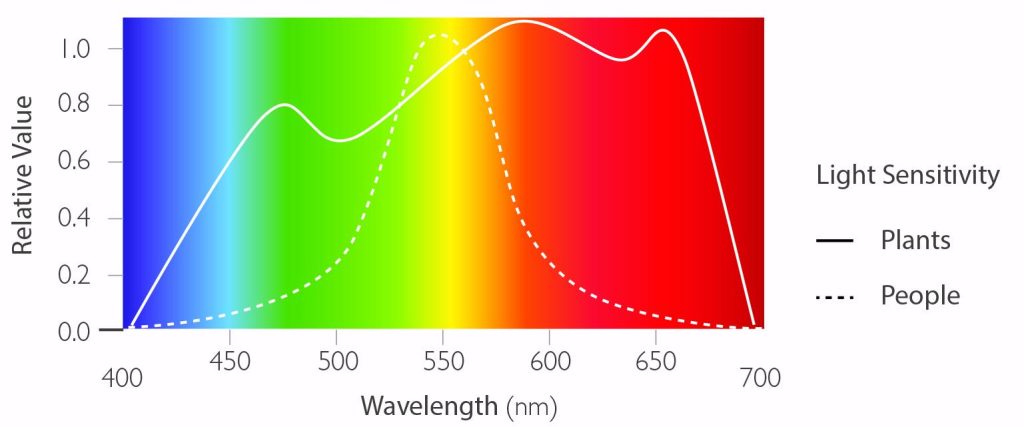
Figure 2: Light Spectrum – Human Eye vs. Photosynthesis.
Storing Seed
Seed longevity varies by species, and ranges from under a year to many years. Storage at sub-optimal conditions can shorten seed longevity and reduce vigor. The optimal storage conditions are cool and dry, with the general recommendation being: Storage temperature (F) + relative humidity (% RH) = less than 100.
Keeping seed in sealed containers with silica gel packs helps keep humidity low.
Choosing Germination Containers
The optimal container for starting seed can vary, and a wide range of options are available. Traditionally, full flat, cell-less containers we used and seedlings were “pricked out” and transplanted early into larger containers soon after germination. Transplanting at the proper time, before roots grow too large and become entangled with adjacent seedlings is key when using open flat methods. Using multi-cell trays or flats has become the most common way to start seeds.
These trays are available in a wide range of configurations and sizes. In general, trays with smaller cells (higher density trays) provide space efficiency, but they can be more challenging to manage culturally, as they need more frequent watering and fertilization. Commercial wholesale propagators often grow in very high-density trays containing 288 or even 512 cells per tray! A tray with 50 or 72 cells provides a good balance between space efficiency and easily manageable cultural needs.
Creative recycling and re-use can turn a wide range of items to seed starting items. Food containers, toilet paper rolls, and egg cartons can be used. Be sure to punch drainage holes in recycled containers, to ensure that they drain properly.
Soil blocks are a container-less option. These can be an excellent choice, but they do require an investment in equipment. Standardizing on one size of block will help to reduce equipment expenses. Soil block media is a bit different from standard seed starting media, as it must hold together well without having a container to give it shape.
Plantable pots can also be used. These are typically made of paper, peat moss, or composted manure. They are ideal for species that can be difficult to transplant successfully. When using plantable containers, ensure that the top of the container is not above ground. Fold the edge over or tear it off if needed. If the edge is exposed, it will wick moisture from the soil and stress seedlings.
Species that are difficult to transplant and best grown in plantable containers if started indoors include:
- Beans
- Corn
- Butterfly weed (Asclepias tuberosa)
- False indigo (Baptisia spp.)
- Okra
- Oriental poppy (Papaver orientale)
- Pea and sweet pea
- Vining crops (squash, melon, watermelon, cucumber, gourds, morning glories, etc.)
Bagging and humidity domes
Using a clear plastic humidity dome over trays can help to increase humidity levels during germination and reduce water needs. Domes that have a vent are ideal, as they maintain humidity and still allow for some aeration. Domes without a vent can be propped up slightly so there is a ¼ to ½ inch gap on one side. Putting a container inside a baggie and tying it loosely (not completely) closed with a twist tie works in the same way as a humidity dome.
When bagging or using domes, increase the amount of ventilation as the seedlings grow, to ensure that they are receiving sufficient oxygen. Avoid bagging and using domes when growing seedlings in a greenhouse or other location that receives strong direct sunlight, to avoid overheating.
Scheduling
Container size has an influence on the time that a seedling can be grown before it needs to be transplanted. In 3 inch or larger plantable pots, seedlings can generally be grown until they are ready to be transplanted to the garden. In smaller containers, seedlings will need to be transplanted to a larger size cell or container before they become root bound. A good general rule is to transplant when seedlings develop their second set of true leaves.
Labeling
It is important to use a label with the specific variety and type of plant being started from seed, plus a backup “map” on paper. This helps to ensure you don’t mix up varieties or lose track of what varieties are being grown in case plant tags are lost. Noting on the tags when seed was sown can help with improving scheduling in the future. Note that “permanent” markers will fade in sunlight when exposed to UV light. Paint pens will generally produce labels that last longer.
Toning Seedlings
Toning or “hardening” seedlings is a process that gradually acclimates seedlings to outside conditions. Sunlight is much, much stronger than artificial lights and can burn plants not acclimated to it. Outdoor conditions also expose seedlings to wind, fluctuating temperatures, and increased water loss.
To tone plants, put them outside in a sheltered location on a mild day for part of the day. Over the course of 1 to 2 weeks, gradually increase the time they are outside. Gradually increase the amount of direct sunlight they receive, and the amount of time between waterings.
Minimizing Disease Problems
Seedling Diseases
Gardeners often struggle with “damping off” diseases affecting their seedlings. Damping off can be caused by a fairly wide range of species of disease organisms, including Fusarium, Pythium, Phytophthora, and Rhizoctonia. These are common microbes responsible for a range of diseases.
The most effective way to manage these diseases is through proper moisture management! The vast majority of problems with disease in seedlings is due to keeping the media overly wet. Thus, damping off is actually more commonly a cultural problem than a disease problem.
The disease triangle concept explains this phenomenon. For disease infection to occur, there are 3 factors that must be met. First, a pathogen must be present; second, a susceptible host must be present; and third, a favorable environment for infection must occur. Without an overly wet soil, a favorable environment for infection is usually lacking, and damping off disease is unlikely to occur.

Figure 3: The Disease Triangle
There are biological fungicide products on the market that can be used to help protect plants from disease infection. These contain beneficial microbes that work to outcompete disease organisms or otherwise inhibit their growth.
There are also several techniques for treating seed to improve germination or reduce potential disease problems.
Tray and Container Disinfection
When re-using trays and other containers to grow seedlings, you can sterilize them with a dilute bleach solution to reduce potential problems with diseases. First, scrub the containers to remove all media and residues. Particles of media and other residues remaining in containers will reduce the effectiveness of the sterilization. Use a 10% (volume to volume) solution of household bleach (sodium hypochlorite) to water. This is 1 part bleach to 9 parts water. Example: ¼ cup bleach, 2 ¼ cups water. Soak for 10 minutes, then rinse well with plain water. Wear rubber gloves when working with bleach solution.
Bleach Treatment
In addition to being used to disinfect trays and containers, a 10% solution of household bleach can be used as a seed treatment to sterilize the seed coat. Seed is soaked in the solution for about a minute, then rinsed with plain water for 3 to 5 minutes. After rinsing, spread the seed out on newspaper or paper towels and allow it to dry. Again, this is a 10% by volume dilution, as described above.
Hot Water Treatments
Hot water treatments can also be used to control seed-borne pathogens, but the need to control the temperature exactly makes this method difficult to use on a home or hobby level. Precision controlled water bath equipment is generally needed for exact control of temperature when heating seed. Typically 122 °F is used for 10 to 30 minutes, but a few species require longer times and a bit higher temperatures. The need for exact temperature control for the entire heating time ensures the treatment is effective and does not damage seeds. Note that most cucurbits (squash, melons, gourds, and pumpkins) should not be hot water treated, as they are too easily damaged. For specific temperature recommendations, see the For More Information section at the end of these handouts.
Peroxide Treatment
Consumer grade hydrogen can also be used without dilution to surface sterilize seeds. A 1 to 2 minute soak is generally sufficient.
Beneficial microbes
There are an increasing number of microbial products available (primarily for the professional horticulture market) that can be used to treat seeds to reduce disease problems. Some are used as a foliar spray, others can be used on the soil or on leaves. These products contain beneficial microbes that colonize plant surfaces and make them resistant to infection by disease organisms.
Tips on Seed Sowing
Planting Depth
A general rule for seed planting depth is two to three times the width of the seed. There are exceptions, particularly for seeds that require light or darkness.
Scheduling Sowing
Base sowing schedule on expected last spring frost date. The size of container used and type of lighting system also plays a role. Allow 4 to 6 weeks of growth after germination as a good general rule. Some faster-growing crops may need less time, while some slower-growing crops will need more time.
Vining crops may be best grown for 2 to 3 weeks to minimize rampant growth and tangling. Slow germinating crops need extra time for germination, and slow growing, small seeded crops may need extra time.
Direct Sowing Outdoors
Pay attention to soil temperature! Sow once temperatures have warmed sufficiently for the crop being sown. Larger seeds are generally easier to establish from direct sowing than smaller seeds. Soil type has an influence – sow deeper in sandy soil and slightly shallower in clay soil.
A thin layer of organic mulch, compost, or worm castings can be applied as mulch after seeding. This helps to retain moisture and prevent soil crusting.
Native species or native mixes can be sown in late summer or fall in a well-prepared seedbed for germination the following spring.
Understanding Dormancy
Seed Dormancy
Although many garden species have been selected over time to germinate quickly, there are still a number of commonly grown plants that can benefit from seed treatment to overcome dormancy. Seed dormancy is a condition that allows seeds to survive in the soil in a state of “hibernation” without germinating, often for long periods of time. Some types of seeds can remain in a dormant state for decades or more. This is particularly true of perennials, especially many native perennial species. It is also true for many types of weed seeds. Verbascum blattaria and Malva rotundifolia have been found to be capable of germinating after over 100 years of dormancy (120 years for Malva, and 140 years for Verbascum), based on the ongoing seed viability experiment started by Professor W. J. Beal in 1879 at Michigan Agricultural College (now Michigan State University).
The specific methods seeds use to remain dormant vary and are not fully understood. Dormancy is beneficial for wild plant populations, though it is usually undesirable for a gardener. Seed dormancy helps to ensure that a population of plants can persist and survive over time and successfully cope with drought and other stressful conditions. If all the seeds produced by a plant were to germinate, but weather became unfavorable for growth, all the new seedlings could die. Dormancy spreads out germination period, allowing seedlings to begin grow over a number of different years. This helps to ensure that plants can successfully mature and produce enough seed to keep a population healthy for the long term. Dormancy can be caused by physical means (like a hard seed coat that resists the uptake of water), by physiological means, or by a combination of factors.
Scarification
One way that seed remains dormant is by having an outer surface that prevents the uptake of water. This can delay or prevent water uptake, preventing imbibition and therefore preventing the start of germination.
Scarification is a process used to disrupt a hard outer seed coat so it can absorb water and germination can occur. Most seeds that have hard, water-resistant seed coats benefit from scarification. Many types of legumes (plants in the bean family, Fabaceae) have hard seed coats, especially when the seed is fully dry. Examples include Baptisia, Lathyrus, Lupinus, and Thermopsis. Another family of plants that commonly benefit from scarification is the Malva or hollyhock family (Malvaceae). This family includes Alcea, Hibiscus, and Malva species. Other plants that benefit from scarification include hard shelled (Langenaria species) gourds and zonal geranium (Pelargonium x hortorum).
Seeds that have a somewhat water-resistant seed coat can benefit from soaking in warm water for a few hours to overnight to speed up germination after planting. Examples of seeds that benefit from soaking include:
- Angel’s Trumpet (Datura spp.)
- Asparagus, edible and ornamental types (Asparagus spp.)
- Bells of Ireland (Moluccella laevis)
- Blue Honeywort (Cerinthe major)
- Canna (Canna x generalis)
- Castor Bean (Ricinus communis) – scarification can also be used. Note: seed is highly poisonous!
- Larkspur (Consolida species)
- Okra (Abelmoschus esculentus)
- St. John’s Wort (Hypericum perforatum)
There are multiple ways to scarify seeds. Mechanical scarification is done through physical means. Using sandpaper to scuff the seed surface is a common technique, and small seeds are often rubbed between two sheets of sandpaper to scarify them. Lightly filing or nicking the edge of a seed with nail clippers or a knife can also be done to scarify large seeds. Be careful when doing mechanical scarification, to ensure the seed is not damaged. The goal is to scratch or chip the seed coat just enough to allow it to take up water more easily.
Exposure to alternating freezing and thawing temperatures is another way to scarify seed. A common way to naturally expose seed to these conditions is to sow the seed outdoors in fall, either in the ground or in flats. Weather conditions during the winter months will help to naturally break down the seed coat. This is a traditional technique for sowing many perennials, especially native species. Winter sowing is another possibility.
A hot water treatment can also be used for seed scarification. Hot (not boiling!) water is used to soak seeds for a few hours to overnight. Be sure that the water is no hotter than 180°F, as higher temperatures can damage seed. An easy way to ensure water is not too hot is to bring water to a boil, remove it from the heat, and allow it to cool for a few minutes before using it to soak seed.
Large commercial growers often use chemical methods to scarify seed. Treating seed with acid is a common technique. This mimics the process that occurs when fruit containing seed is eaten by an animal and passes through its digestive system. Acid requires careful handling and protective equimpent to ensure it is used safely. Care must be taken to not treat too long to avoid damaging the seed. It is also important to properly denature and safely dispose of the used acid after seed treatment.
Stratification
Stratification is another technique used to overcome seed dormancy. It is done by providing moist conditions and a specific temperature. Cold stratification is the most commonly used technique, and species that need cold stratification are sometimes called “frost germinators.”
To cold stratify seed, provide a cool, moist environment (typically 35 to 40 °F) for a period of 4 to 12 weeks or longer. Note that moisture is required for successful stratification. Exposing dry seeds to a cold period will not stratify them. (Consider that most bulk seed sold through wholesalers is stored dry at around 40 °F.) Often a 2 to 4 period of warm stratification (warm, moist conditions, usually 65 to 80 °F) is provided before a cold stratification period.
Seed can also be mixed with moistened sand, peat moss, or vermiculite placed in plastic zipper bags kept in a refrigerator to provide cold stratification. Be sure to label bags well with plant type and date stratification starts. Trays can also be sown in fall in trays and kept in cool conditions or placed directly outdoors to overwinter. This is a very traditional method for sowing perennials and many species of woody plants. One notable German perennial seed supplier still recommends fall sowing and covering trays with snow for perennial species that need stratification.
Species benefitting from stratification
- Angel’s Trumpet (Datura metel)
- Bells of Ireland (Moluccella laevis)
- Peruvian Lily (Alstroemeria)
- Prince’s Feather (Polygonum orientale)
- Solitary Clematis (Clematis integrifolia)
- Sweet Violet (Viola odorata)
- Many species of hardy perennials – especially native perennial species
Winter Sowing
Winter sowing is a technique that is gaining in popularity. It is a form of the traditional outdoor sowing technique commonly used for perennial species, but can also be used for annuals. It is very similar to outdoor fall sowing but is done later into the winter season and typically uses covered containers with perforated lids. Containers are often recycled food containers like milk jugs or soda bottles filled with moistened potting media, sown with seed, and then taped shut and put outdoors where they will be exposed to cold temperatures. Be sure to include a plastic plant tag with the species and variety information, as wooden tags tend to degrade during winter.
When the temperatures warm up in spring, seedlings will begin to germinate. When temperatures warm up in spring, lids are removed or additional ventilation holes are made, to ensure there is good air flow and to prevent the containers from getting overheated.
Seed Treatments: Seed Handling
Pelleting, Multi-pelleting, & Film Coating
Some types of seeds are treated with a colored clay coating to make them easier to handle and sow, especially when automated seed sowing equipment is used.
Very small seeds, like Begonia, Petunia, and Lobelia are often pelleted. In the pelleting process, thin layers of clay coating are applied to seed, creating a small round “ball” with a seed in the middle. Though the pellet is typically still small, it is much larger than the tiny seed it encases. In some cases, multiple seeds are encased in a single pellet. This “multi-pelleting” is usually done for species that benefit from having multiple seeds sown per container. Some new seed products contain multiple varieties of the same species or a mix of several species. These multi-pellets are designed for mixed containers and hanging baskets.
Some vegetable seeds are also pelleted to make them easier to handle. They are typically much larger sized seeds than pelleted flower seeds and can be sown at the same depth as non-pelleted seeds. Pelleted flower seeds are usually surface sown and not covered. They need to be watered in sufficiently so that the pellet dissolves with the first watering, allowing the seed to germinate.
Some types of seeds are treated with a thin clay coating called a “film coat”. Like pelleting, this makes seeds with irregular surfaces easier to handle. Film coated seeds are sown the same way as uncoated seeds.
Seed Treatments: “Secret Sauce” Treatments
Priming Treatments
Priming is a process that allows seed to absorb water (imbibe) and begin the metabolic activation process, before being dried down. Priming conditions seed for germination when sown, and it can help to improve the vigor of old seed lots.
Priming improves germination uniformity and speed, especially under stressful conditions such as low oxygen, saline soil conditions (high salt levels), or non-optimal temperatures. Priming can be combined with “secret sauce” treatments in the soaking solution to further improve its effectiveness.
For a basic priming recipe, seed can be soaked for 1 hour to overnight in water (or water with “secret sauce” added), then drained and dried on a paper towel for later sowing. If desired, wet seed can be sown immediately after priming.
Smoke Water
Fire is a known to be a germination stimulant for some species of plants, particularly trees and woody plant species native to fire prone areas in South Africa, Australia, and the Western US. Research also indicates that in some plants it is not the heat from fire, but chemicals in smoke that stimulate germination. Compounds called butenolides in smoke are thought to be involved in this effect. Exposure to smoke can result in improved germination, including faster germination speed and improved seedling vigor in some species. This is still experimental, and more research is needed to fully understand how best to use smoke treatments to improve germination.
If you wish to try smoke treatment at home, start with a 1% liquid smoke solution and soak seed for 1 to 24 hours before sowing. Use an “all-natural” liquid smoke for the solution. To easily make a gallon of smoke solution very close to 1% concentration, add 3 tablespoons of liquid smoke to a gallon of water (or use 12 mL liquid smoke per liter of water)
Examples of plants that benefit from smoke treatment
- American feverfew (Parthenium integrifolium)
- Canadian milk vetch (Astragalus canadensis)
- Coneflower (Echinacea pallida, E. purpurea, E. paradoxa, E. tennesseensis)
- Corn (Zea mays)
- Eggplant (Solanum melanogena)
- Gayfeather (Liatris spp.)
- Mountain mint (Pycnanthemum pilosum, P. virginianum)
- New Jersey tea (Ceanothus americanus)
- Pumpkin (Cucurbita pepo)
- Round-headed bush clover (Lespedeza capitata)
- Sideoats grama (Bouteloua curtipendula)
- Stiff goldenrod (Oligoneuron rigidum var. rigidum)
- Tickseed coreopsis (Coreopsis lanceolata)
Hydrogen Peroxide
A 10 to 20 minute soak in full concentration consumer grade hydrogen peroxide (3%) can help to break down hard seed coats and will also sterilize the seed coat. A dilute hydrogen peroxide solution can be used as a priming solution. A 1% or lower solution (1 part peroxide in 2 parts water) can be used for priming seed. Soak for an hour up to overnight. Some studies use a very low rate of peroxide for priming, about 0.15% peroxide, or 3 mL per 2 liters of water (1/2 teaspoon in 2 quarts of water).
Worm Castings (Vermicompost)
Worm castings contain small amounts of the plant hormone gibberellic acid (GA), which can promote germination in many species. Seed can be lightly top dressed after sowing, or 5 to 20% worm castings can be mixed into the seed starting mix (by volume). Some gardeners make a worm casting “tea” to water in seeds. This can be done by soaking a cup of worm castings in a gallon of water for several hours or overnight.
Chitinase
Chitinase is a natural enzyme that breaks down chitin. Chitin is commonly found in insect and crustacean exoskeletons and in fungal cell walls. Chitinase has been found to stimulate seed germination and promote natural resistance to disease infection in plants. It is effective at small concentrations (a few mL per liter of water).
Willow Extract
The bark and leaves of willow (Salix) species contain salicin, flavonoids, phenols, and other plant beneficial compounds. Historically willow has been used medicinally for pain relief, as it contains aspirin-like compounds. It also has a history of being used as a natural treatment to enhance rooting of cuttings.
There is some research indicating that extracts of willow leaf or willow bark can improve seed germination. These could potentially be used in seed priming to improve results.
Bleach
Some species, notably many wild tomato species (Solanum cheesmaniae, S. galapagense, S peruvianum and others) benefit from treatment with a bleach solution to improve germination. A fairly long bleach soak weakens the seed coat in these species. Seed is soaked for 30 to 60 minutes in a 1:1 mixture of water and household bleach, rinsed, and sown without being allowed to dry. This method can also be used to treat old seed lots of tomato that have not been stored at optimal temperatures.
Special Cases
Fresh Germinators
Germination requirements can change over time. In some cases, a period of dry storage can result in improved germination. In other cases, species become dormant with storage. In a few cases, fresh seed will germinate readily, but seed declines rapidly in storage, typically having a shelf life of 6 months or less, even when stored under ideal conditions. I call this type of plant a “fresh germinator.” They are best sown as soon as possible after harvest, and the best success may come from harvesting seed from your own “mother plants.” For some species, cold stratification may be helpful when working with seed of fresh germinating species which has been stored, but this is not always very effective.
Examples of fresh germinators include:
- Blue Poppy (Meconopsis)
- Canada Ginger (Asarum canadensis)
- Corydalis (Corydalis spp.)
- False Anemone (Anemonopsis)
- Foamflower (Tiarella)
- Hellebore (Helleborus) – the classic example
- Masterwort (Astrantia)
- Monkshood (Aconitum)
- Peony (Paeonia)
- Spring Adonis (Adonis vernalis)
Dealing With Very Old Seeds
There are a few techniques that have proven effective when trying to germinate very old seed, particularly if it was stored in sub-optimal conditions. These work well with seeds of tomato, pepper, and eggplant that are 10 or more years old.
Mix up a dilute solution of any good, balanced liquid fertilizer. Mix at about one-third strength (1 teaspoon per gallon of water if the usual rate is 1 tablespoon per gallon.) Moisten, but do not fully saturate a paper towel or two with the fertilizer solution. Place seed to be germinated on the paper towel so that it is not clumped together. Seeds that are touching are likely to rot. Fold the paper towel over the seed and place the seed in a zipper storage bag. Seal the bag so that it contains air, and place in a refrigerator for about 16 to 20 hours. Before removing seed, prepare a germination tray with a high quality growing medium and moisten it properly. Remove the bagged seed from the refrigerator and carefully sow each seed on the surface of the growing medium. Cover the seed only very lightly with bit of growing medium or with coarse vermiculite. Ensure the covering is minimal enough so the seeds will still receive some light. Germinate at 85°F, using a heat mat or other system to ensure the media remains consistently at the proper temperature. Check daily for germination for 3 weeks.
Note that using a bleach or hydrogen peroxide surface sterilization before placing seeds in paper towels may be helpful, particularly if the seed lot is known to be prone to disease.
For More Information
Dr. Norman C. Deno (a retired chemistry professor) did a lot of work after retirement classifying plant germination requirements, and he produced a book plus two supplements with his findings. Dr. Deno’sbooks are out of print, but they available for download through the National Agricultural Library Digital Collections (NALDC). The books include information on using Gibberelic Acid (GA) to overcome dormancy. GA can be ordered from JL Hudson Seedsman in La Honda, CA – http://www.jlhudsonseeds.net/GibberellicAcid.htm
- Seed Germination, Theory, and Practice – http://naldc.nal.usda.gov/catalog/41278
- First supplement – http://naldc.nal.usda.gov/catalog/41279
- Second supplement – http://naldc.nal.usda.gov/catalog/41277
The USDA’s extensive Woody Plant Seed Manual (Agriculture Handbook 727) is available as a free .pdf. It is a great reference for info on germinating trees and shrubs – http://www.rngr.net/publications/wpsm
For more information on the Beal Seed Experiment at Michigan State University, see https://bealbotanicalgarden.msu.edu/science/seed-experiment
For temperature requirements for hot water treatment of seed for disease control, see https://hort.extension.wisc.edu/articles/hot-water-seed-treatment-for-disease-management/
UW-Madison Extension Ask A Gardening Question site: https://hort.extension.wisc.edu/ask-a-gardening-question/
–Allen Pyle, Horticulture Outreach Specialist, University of Wisconsin-Madison Division of Extension
 Container Design
 Apple Bagging
 Small Space Gardening
 Gardening & Climate Change: Introduction